If you’re sending out regular newsletters to clients, you’re already ahead of most of your competitors, but you can step it up a notch further by adding tracking to your emails – and then paying heed to what that tracking says.
The most simple and cost effective way to track your email campaigns is by using UTM (Urchin Tracking Monitor) codes.
UTM codes enable you to analyse the traffic being generated by your email campaigns and give businesses a much better understanding of their audience’s behaviour, by allowing you to gauge what they’re actually interested in and what they’re actually clicking on in your correspondence.
You can generate UTM codes quickly and easily in your Google Analytics account to see just how effective (or ineffective) a specific newsletter campaign is performing.
By incorporating these clever UTM codes into your Google Analytics account, you’ll be able to delve into the data using up to five tracking parameters:
- Medium – the medium you are using eg social media, subscriber list, paid advertising
- Source – where the click came for eg your email newsletter
- Campaign – the name of your promotion Bomboniere promo
- Content – content specific details eg image1 or textlink2 (optional)
- Term – keywords used in paid search (optional)
What does a UTM code look like?
A typical URL with a UTM tracking code looks something like this:
http://www.yourwebsite.com/?utm_source=yoursource&utm_medium=yourmedium&utm_campaign=yourcampaignname
Take a peek at your web browser’s address bar above. The address for this article contains a UTM code and says:
Using Google’s URL builder to generate UTM codes
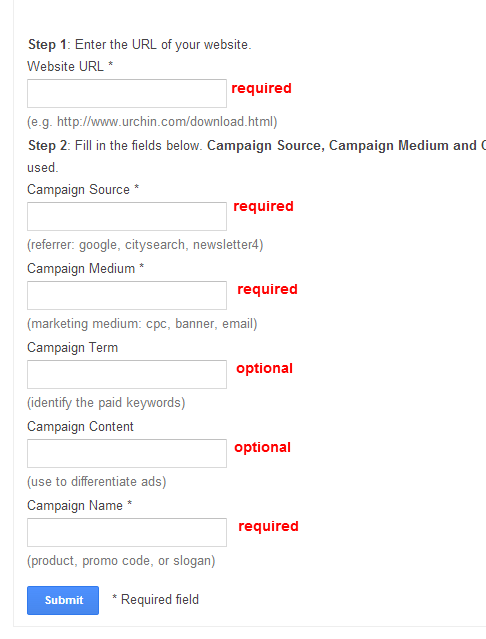
Located within the Custom Campaigns menu in your Analytics account is Google’s URL Builder (pictured below), which will automatically generate your UTM codes.
Simply copy and paste the URL generated by the URL builder into your email newsletter and, once the newsletter is sent, the tracking will automatically start. Visit Google’s page for more instructions on this process.
Please note the following:
- UTM parameters are case sensitive so the word ‘Wedding’ and ‘wedding’ will generate different reports.
- Your URL should send traffic to a property you own, such as your website, blog or app
- If you generate your code manually, you must add the & as this tells Analytics where your tracking code starts and end
- Decide on your naming and related conventions for creating codes and parameter values
Naming conventions are important for consistency and effective data analysis or you could end up with some messy data, so be vigilant from the beginning.
For example if you use social media as source in one code and social media as media in another code, your results will be more difficult to analyse.
That’s it! It’s a very simple process that can reap fantastic rewards.
Tracking and analysing your UTM codes
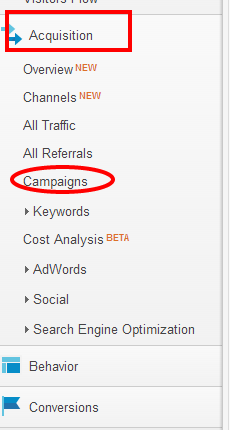
Once In Google Analytics, select Acquisition > Campaigns to start analysing your figures:
You will then see data arranged by campaign, but, obviously, you’ll need to wait for data to populate first.
Data can be further filtered and arranged by you various parameters as shown below and, by delving into these figures, even at a most basic level, you’ll start to see what users are clicking on, what they’re not clicking on, and whether they prefer pictures over links in your newsletters.


